Get a MESH LARGE UTILITY TOTE for $12 when you spend $50. SHOP NOW
To access key features of this site, you must have JavaScript enabled.
Craft a Fun Thanksgiving

It won’t be long until Thanksgiving, so whether you’re celebrating it with immediate family or extended family, or having a Friendsgiving with your besties, why not start a new tradition this year? Make your Thanksgiving get together a creative feast for the eyes as well as the palate with fun craft projects to help pass the time before or after eating turkey!

Shown Above:
Get Creative™ Rectangle Pouch in Charcoal Crosshatch
Get Creative™ Crossbody in Charcoal Crosshatch with orange Fox Icon-It™ and white Fun Dots font.
CRAFT PROJECTS FOR KIDS
Sometimes it’s nice on Thanksgiving to disconnect from cell phones and electronics and just enjoy spending time together doing fun activities. Keep the younger kids occupied and out of the kitchen with these fun yet easy craft projects.
LEAF TURKEY
All you need is our turkey template, some brightly colored autumn leaves and a few other crafting supplies:
- Glue or paste sticks
- Kids’ scissors
- Google eyes
- Turkey template (includes body, legs and beak/wattle)
- Colorful leaves (real or artificial ones from the craft store)
- Colored markers or pencils
- Construction paper

Steps:
- Print out our turkey template ahead of time so all the kids will have to do is cut them out.
- Have the kids gather colorful leaves outdoors if you decide to use real ones.
- Cut out turkey template (includes body, legs and beak/wattle).
- Color the turkey with the markers:
- body = brown or orange
- beak = yellow
- wattle = red
- legs = brown, orange or yellow
- Attach the google eyes.
- Glue a few leaves to the back of the turkey and fan them out to form the tail. Make sure the leaves stick out from behind the turkey to be seen.
- Glue another row to the back of the first row of leaves in the same way, adding as many rows to the tail as desired.
- If desired, paste the whole turkey to a piece of construction paper.

GRATITUDE TURKEY
This is a great way for kids to share what they’re thankful for and have fun doing it! Here’s what you’ll need:
- Cardboard toilet paper rolls
- Construction paper (multiple colors)
- Glue or paste sticks
- Kid’s scissors
- Markers
- Google eyes

Steps:
- Adhere the google eyes to the toilet paper roll near the top when it’s turned on its end.
- Cut out a triangle beak in orange or yellow and a squiggly red wattle from the construction paper. (You may need to help younger children with this).
- Glue the “wattle” to the back of the beak so it extends down from the pointy tip.
- Glue the beak and wattle to the toilet paper roll just below the eyes.
- Cut out different colored feather shapes from the construction paper of the same size. (again, smaller kids may need help with this).
- On each feather near the tip, have the kids write something they are most thankful for.
- Glue the first feather to the middle of the back of the toilet paper roll so the writing can be seen.
- Glue the remaining feathers to the backs of the other feathers, fanning them out like a tail with the writing clearly visible at the top.
- If desired, glue the entire turkey to a piece of construction paper.

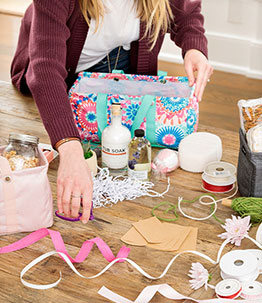
FRIENDSGIVING CRAFT PROJECTS
Looking for something crafty to do with friends or older kids on Thanksgiving? Here are two ideas to make your holiday gathering a huge success. Planning a virtual Friendsgiving get-together? No problem! Tell your friends what they need to get before-hand and share your craft-making experience together online!

Shown Above:
Get Creative™ Zipper Pouch in Charcoal Crosshatch with Art Supplies Icon-It™ and white Fun Dots font.
Get Creative™ Double Pouch in Twinkling Plum.
Get Creative™ Large Carrier in Floral Ikat in white Block font.
MASON JAR LEAF CANDLES
These glowing candles make great decorations for Thanksgiving and all season long. Here’s what you need:
- Glass mason jars (plain, smooth ones work best)
- Raffia or ribbon
- Colorful fall leaves (artificial ones tend to work best)
- Decoupage glue (Mod Podge or other brand)
- Foam brush (2-inch is fine)

Steps:
- Clean the outside of the mason jar(s) well (rubbing alcohol is a good cleaning agent)
- Make sure your leaves aren’t too stiff. Bend them a little to loosen them up. Thin fabric leaves are best for adhering to the jar. You can also iron fabric leaves to loosen the fibers.
- If using real leaves, be sure to dampen them slightly to unstiffen them.
- Dip your brush into the decoupage and paint a thin layer on the jar.
- Once it becomes sticky, press the leaf to the jar, smoothing it out as you press from center to the edges.
- Paint more decoupage on the top of the leaf in thin layers making sure to smooth the edges. Use your finger if necessary.
- Layer leaves around the jar and overlap them. Once complete, it will take a few hours to dry completely.
- Finish off the top of the jar with raffia or ribbon.
- Place a candle inside and watch it glow!

PRINTABLE "GIVE THANKS" CARDS
This is a fun and easy way to show how grateful you are for your friends and family, and decorate your home at the same time! Here’s what you’ll need:
- Printable card template
- Scissors
- Hole Punch (single)
- Spool or ball of twine
- Thin Black Marker (or other color if preferred)
- 8 ½ x 11 printer paper (card-stock weight in fall colors if available)
Steps:
- Download our printable Thank You Card template to your computer.
- Insert the card-stock quality paper into your printer.
- Print the template on your paper.
- Cut out the cards to the allotted size shown in the template.
- Have each friend or family member fill out a card using the same type of marker.
- Use the hole punch to make two holes in the top of each card (one hole near each corner).
- Use the twine to weave through the holes of each card to create a chain (as shown in image).
- Hang the “Give Thanks” card chain on the fireplace mantel or somewhere it can be easily seen.
- Start a tradition and make a new one every year!